We have invested quite heavily in training and ensuring we're ready to roll out Cisco SDA Fabric deployments at scale.
One of the big ticket items on this journey is to have a full fabric lab. We've built this lab and ready to share with our customer base.

Building out an SD-Access lab is no small feat. We have deployed a wide range of equipment, including the latest Catalyst switching and wireless, alongside the latest access points.
Coupled with any SDA lab is the mandatory requirement to use Cisco's DNA Center for management, which represents a large investment in itself. DNA Center is used extensively in the process of designing and pushing out contracts (the process by which you open up access from client A to client B).
As a side note, it's worth a look at our Zero Trust blogs, which talk to the business outcomes that SDA can deliver. One key driver is security, and Zero Trust is a big aspect of that.
One other note, before we take a look at an actual lab diagram and setup - is that you need a way to handle Identity in your lab. We have Cisco ISE for that purpose, but Identity is a key aspect to SDA - you need to know who you are connecting, in order to give them the unique access each client deserves.
ASSOCIATED BLOGS:
- Cisco SDA
- SD Access Deployment
- Zero Trust Architecture
- Zero Trust Deployment
- DNA Center Beginners Guide
Cisco SD-Access Lab Background
Cisco DNA SD-Access is the future of Cisco enterprise networks, and whether you're ready or not, it's here.
At IPTel, we have multiple SD-Access deployments under our belt, and we decided to create a new SD-Access Lab to help our clients get across all the in's and out's of an SD-Access deployment.
In building our own lab, there are a few lessons learnt.
The first up is that you have to allocate enough time and budget to the project. You'll need a shopping list of:
- Switching: Cisco 9300, 9400, 9500 switches
- Cisco ISE: Authentication and identity platform, critical to the operation of SDA
- Cisco DNA Center: Management and automation platform for the network
- Wireless LAN: 9800 WLC to control your APs
- Access Points: Cisco 91XX APs
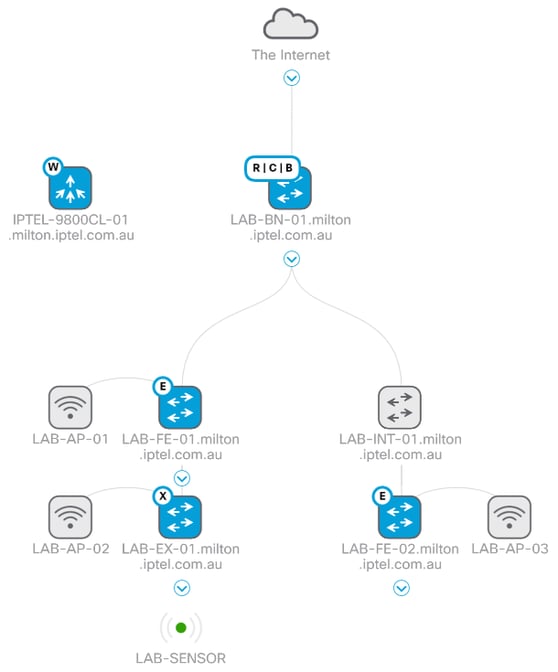
An overview diagram of our lab is shown below:
If you didn't know, SD-Access (or SDA) is short for Software-Defined Access. It is a networking architecture that decouples networking from transport and policy.
On your shopping list will also be some lab rack space - and an air conditioned environment to rack up and operate your lab equipment. We've installed the equipment in our comms room for this reason.
ASSOCIATED BLOGS:
Fabric Underlay vs Overlay
Automated by DNA Center, an underlay network supports a virtual overlay which carries traffic between devices, creating a fabric network.
We've got a fuller explanation of the concept of underlay and overlay in our Cisco SD Access Deployment blog, if you wanted some more in depth reading.

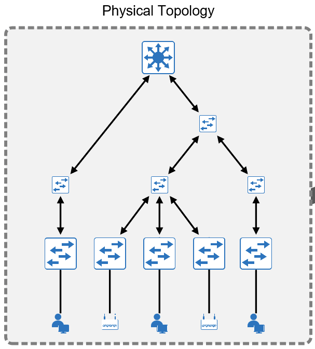
The Underlay is built from the physical topology. This is where the layer 3 routing protocols live (VXLAN also lives here).
You can essentially view the underlay as a giant layer 3 network, pushed right out to the edge.
As clients connect on the edge, they are authenticated, allocated an IP address and routed from this point.
The magic happens with the application of the overlay, where the specific rules are applied to allow clients to access the services they need.
This is the fundamental concept of the Zero Trust model - no access until it is explicitly granted.
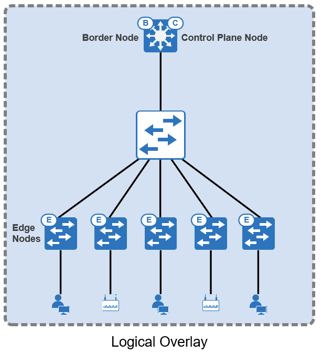
The Overlay is the deployment of contracts to allow clients to access services. The image blow illustrates the key components. Contracts are built and pushed from DNA Center.

As you can see, there's a border node and control plane node at the top of the hierarchy - this is the entry and exit point for the fabric.
A range of clients connect at the access layer (the edge nodes) and once authenticated, the contact that applies to that specific client is enacted, with traffic flows tagged.
Our lab network let's us demonstrate how to deploy SD-Access (including LAN Automation and PnP), and how it uses automation to configure application and security policies for the entire fabric.
We have a full SD-Access network, including wireless, meeting the architecture of a medium-sized site.
We've even included an IOT industrial ethernet switch for extra functionality.
ASSOCIATED BLOGS:
- Cisco SD Access: Micro Segmentation Explained
- Troubleshooting with DNA Center
- Cisco DNA Center Assurance
- 5 Ways DNA Center Solves your Challenges
Cisco DNA Center Enablement: Summary
If you're interested to learn more about how we can help, download our Cisco DNA Center Enablement brochure.
In this blog, we've shown some insight into how you go about building your SDA lab. We use our lab for customer demonstrations, training and testing out installations.
If you're interested in how we can train you, drop us a line at sales@iptel.com.au
In order to move into the world of SD-Access you will need to have a network team that has confidence to support the environment. A lab environment goes a long way in providing that level of confidence for your engineers.
The positives with SDA is that you can quickly roll out large scale changes that would otherwise take a lot of time. There in lies the risk too - you can't be too careful before you roll out a change and the ability to lab test it could reap a lot of rewards.
ASSOCIATED BLOGS:


.gif)
.gif)