.png?width=200&height=59&name=IPTellogo-byline-2020-dark-v2-pnd-optimised-500%20(1).png "IPTellogo-byline-2020-dark-v2-pnd-optimised-500 (1)")
Cisco DNA SD-Access "Software Defined-Access" is the future of Cisco enterprise networks.
This is the second part in a two part series, to provide you insight in to how you can quickly get your Cisco SD-Access Lab up and running.
SD Access Lab Recap
In part 1 of this series we looked at the background of Software Defined Networking , and how this is translated in the Cisco SDA Fabric world.
Cisco DNA Center is a fundamental component, along with the key pre-requisites of Planning, Cisco ISE integration, software compatibility and Licensing.
Let's pick this blog up where we left off from the last one - with SD-Access Policies.
ASSOCIATED BLOG:
Policies
Next, we'll need to define the policies that will dictate the network intent.
All access control, macro and micro segmentation and QoS policies are created in the Policy section.
SGTs are created here and are nested within Virtual Networks, which DNAC will deploy during provisioning.
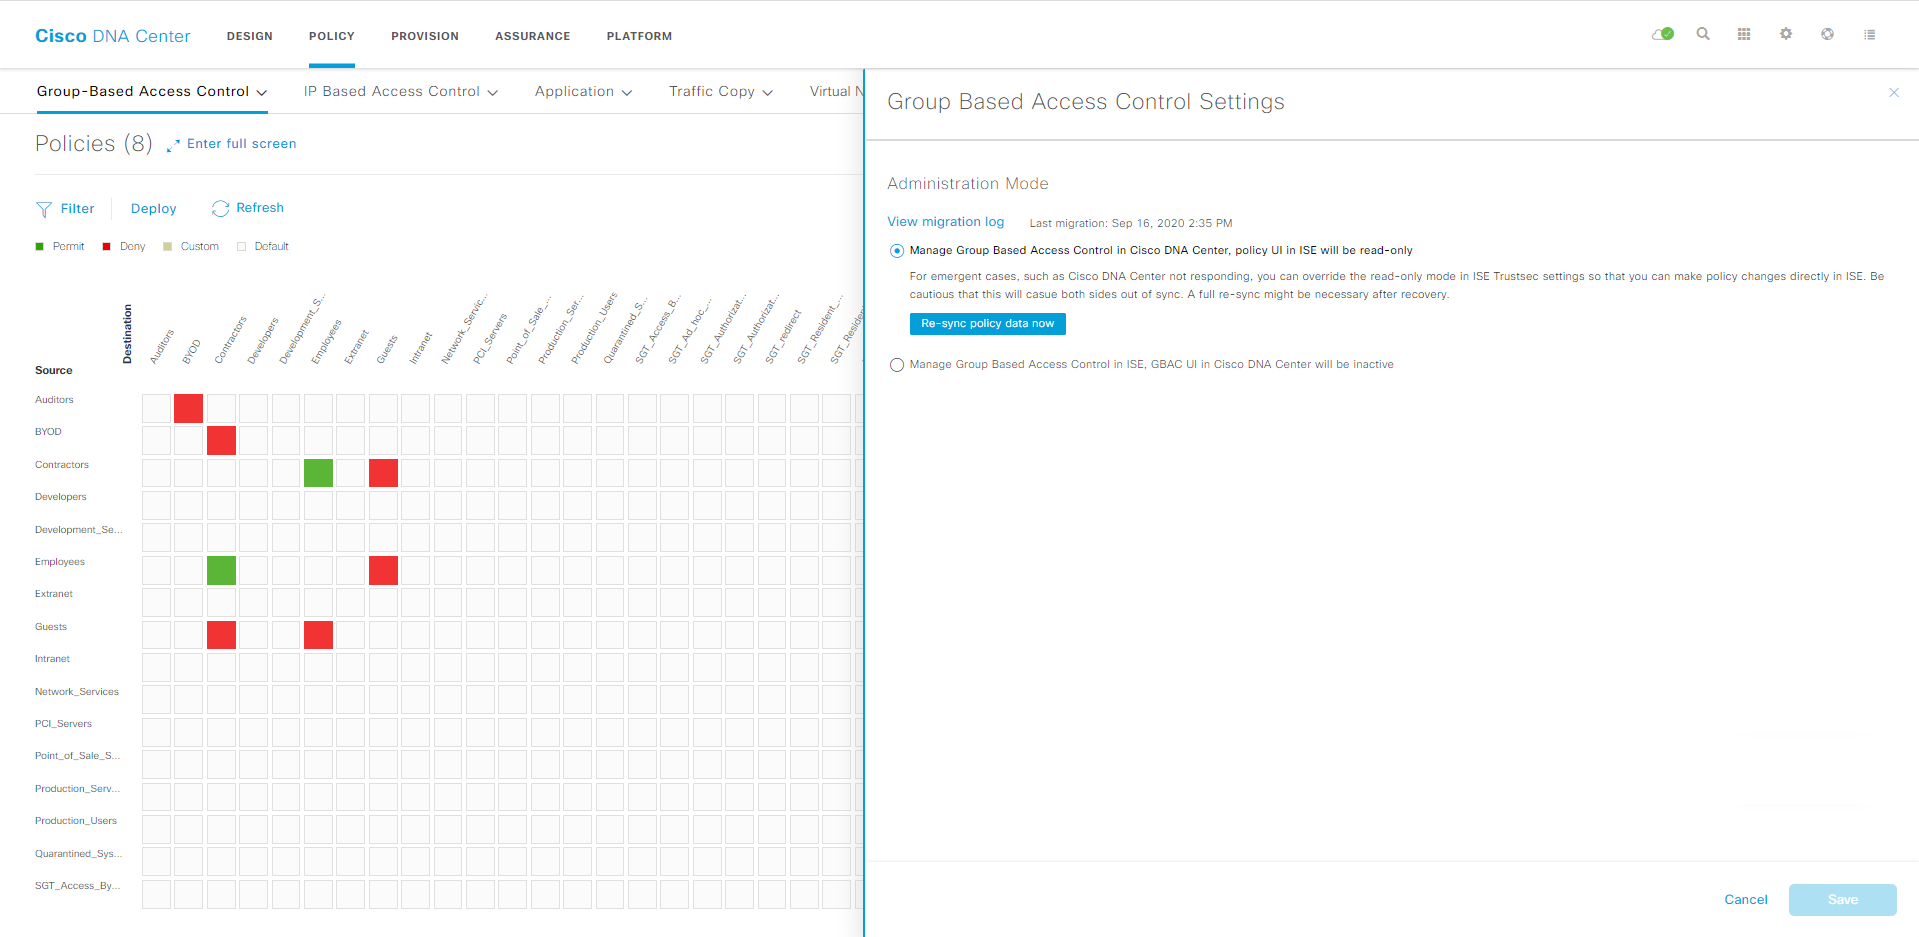
We can use Group-Based Access Control to define the policies that ISE will enforce with TrustSec Security Group Tagging (known in the DNAC world as Scalable Group Tagging).
The image blow shows the definition of the group based access control:
When our device team has finished installing and patching all our switches together, we're ready for discovery and provisioning using LAN Automation!
In our lab, we manually discovered our fusion router and configured it with an IP address on the port facing the border router.
This means the fusion can be used as a seed for discovering every device in our SD-Access network.
When we ran the LAN Automation, our switches were in a factory default mode, meaning they have a PnP agent running as if they were straight out of the box.
Setting our fusion router as a seed device caused DNA Center to push some temporary config to the router in order to provide connectivity to all the downstream devices.
Once LAN automation has discovered and claimed all the devices, we stopped the process which caused DNAC to remove all the temporary config from the seed device.

With minimal configuration effort, we've got a fully interconnected LAN, also known as our underlay!
This vanilla install is now ready for the full underlay and overlay to be provisioned.
ASSOCIATED BLOG:
- Cisco DNA Center Beginners Guide
- Zero Trust Architecture (ZTA) Introduction
- Zero Trust Architecture (ZTA) Deployment
Provisioning Underlay
Once we have created our network underlay with LAN Automation, (which has created a layer 3 IS-IS domain), we can take the step to "provision" our underlay.
This is where the config from our previous design work is pushed to the network (think AAA, Syslog, QoS etc).
Then we began to construct our fabric overlay, which is where SD-Access really comes to life.
ASSOCIATED BLOG:
Fabric Overlay
We define our device roles, which for us were all on one device as we had a Fabric-in-a-Box.
Even if we had 100 switches, it would all take just a matter of minutes to define and deploy all of these devices to the fabric overlay.
When onboarding our device to the fabric overlay, DNA Center automatically deploys an enormous amount of complex config, mostly comprising of LISP and VXLAN.
These are the vital components of the fabric overlay, making up the control and data planes.
.png?width=258&name=Node%20Diagram%20(small).png)
In our environment, once everything was interconnected and booted, it took approximately 90 minutes to get this stage where we had a fabric underlay and overlay deployed and managed solely by DNAC.
All that was left to do is to paste a few lines of config onto our Fusion router to allow specific routing between our VNs, and to configure edge host onboarding for endpoint connectivity.
And that was it, a full Fabric-in-a-Box SD-Access network built from scratch in little under 2 hours.
ASSOCIATED BLOGS:
Cisco SD-Access Lab: Part 2 Summary
And there you have it. Hopefully this two part series has been of use to let you have some insights in to how to quickly configure your SD-Access lab.
We have a bit of a luxury of course, with in-house DNA Center and enough equipment to build a functioning lab, and in the designing and configuring SD-Access, it is something you really have to invest in.
The new technology is so different from the good old CLI that it really needs some time to learn and experiment before you deploy.
We've converted our office to SD-Access, in order that we use the technology each and every day - so far, so good.
If you need any assistance with your SDA Fabric deployment, feel free to drop us a line.
ASSOCIATED BLOGS: