Cisco DNA SD-Access "Software Defined-Access" is the future of Cisco enterprise networks, and whether you're ready or not, it's here.
In this blog series, we're going to take a look at the base setup of your SD-Access Lab environment and provide some useful links along the way to content to help you understand the topic more fully.

At IPTel, we noted this recently and decided to create a SD-Access lab network from scratch, to get across all the in's and out's of an SD-Access deployment.
ASSOCIATED BLOG:
Cisco DNA Center
The bedrock of an SD-Access Access is the management station, which for Cisco is DNA Center.
 If you didn't know, DNA Centre (DNAC) is the Cisco management and orchestration appliance for the SD-Access network.
Using DNAC, we can undertake the base management tasks of network monitoring and management.
It's in the space of configuration that DNA Center really comes into its own, and so it forms a key component of your SD-Access lab - and also your real world installation.
ASSOCIATED BLOGS:SDA Fabric Background
To kick off with, you might be wondering what SDA Fabric is.
.png?width=201&name=What%20is%20Cisco%20SDA_%20(Instagram).png) In short - and general terms - Software Defined Networking is all about controlling your network from a GUI based management station, issues policies and profiles to network equipment to configure the equipment.
In short - and general terms - Software Defined Networking is all about controlling your network from a GUI based management station, issues policies and profiles to network equipment to configure the equipment.
The equipment is often treated as hands off, with all configuration pushed from the management station.
This change takes a little getting used to - the CLI is all but abandoned in SD-Access.
There's some major advantages over the traditional way we've configured networks - speed is one, and also new features such as Micro Segmentation and Macro Segmentation.
ASSOCIATED BLOG:
Cisco SD-Access Lab Prerequisites
The following sub-sections walk you through a range of pre-requisites to commence your SD-Access lab setup.
Planning
Some people prefer skip any form of planning, but it's best to have a detailed network design completed before anything ensure that everything makes sense.
We frequently design enterprise LAN and WLAN environments, fully integrated with ISE and DNAC. In our opinion, this is a must - without this you can get half way through your network setup and realise you've missed something and have to revert all the way back to the start.
Cisco ISE
DNA Center uses Cisco ISE as a TrustSec policy enforcer for the SD-Access deployment.
We've found it's good to ensure that the TrustSec data from ISE is migrated to DNA Center before you start your SD-Access deployment, then you can have a smooth run implementing the network with DNAC as a single plane of glass.
Compatibility
Check the DNA Center SD-Access compatibility matrix at http://cs.co/sda-compatibility-matrix to ensure your device hardware and software can be integrated into the SD-Access network.
Licensing
In order to utilise the full capability of DNA SD-Access with LAN Automation, you'll need DNA Advantage licensing on your network devices.
ASSOCIATED BLOGS:
With no further ado, let's take a look at the actual configuration of the lab.
ASSOCIATED BLOGS:
Design, Policy, Provision
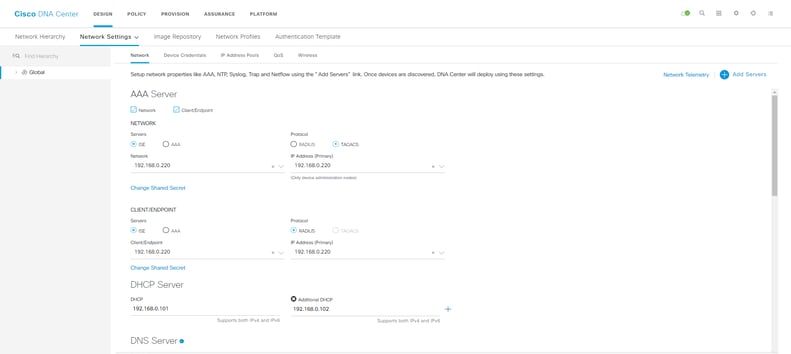
The first step is to access the Design, Policy and Provision menus, as shown on the DNA Center screen shot below:

The DNAC WebUI is laid out in the way that you should deploy your SD-Access network, and this is important to follow. This is how the process works.
ASSOCIATED BLOG:
Network Design
Now we design the network!
Cisco DNA Center provides a toolkit to define your network design within the appliance, and this will determine how your network is deployed later.
This means:
- Creating a network hierarchy of sites and buildings
- Specifying CLI, SNMP and HTTPS credentials to be used on devices
- Allocating an IP address block for your entire enterprise (this is chopped up per site)
- Specify QoS models
- Creating the SSIDs to be in use for Wi-Fi
We also get to determine the software versions that our devices will use, but if you've got a greenfield DNAC, this will be relevant at a later stage.

Later on, all of these configuration settings are pushed to your network devices without you having to take to the CLI.
It's pretty neat!
ASSOCIATED BLOGS:
- Cisco SD Access: Micro Segmentation Explained
- Troubleshooting with DNA Center
- Cisco DNA Center Assurance
- 5 Ways DNA Center Solves your Challenges
Policies
Next, we'll need to define the policies that will dictate the network intent.
All access control, macro and micro segmentation and QoS policies are created in the Policy section.
SGTs are created here and are nested within Virtual Networks, which DNAC will deploy during provisioning.
We can use Group-Based Access Control to define the policies that ISE will enforce with TrustSec Security Group Tagging (known in the DNAC world as Scalable Group Tagging).
That's it for this blog - we'll continue with more about SD-Access Policies in part 2 of this blog, Cisco SD-Access Lab: Part 2.
Cisco SD-Access Lab: Part 1 Summary
Hopefully the above is a useful start to our two part series on how to get your Cisco SD-Access lab up and running.
The overall SD-Access ecosystem is quite large, with a lot of new concepts. Those of us that have known and loved working on the Cisco IOS CLI will find all this quite a jolt; networking as we know it has been turned on it's head.
With the wealth of new features - especially in security - along with the speed of deployment, the rise of SDA Fabric is unstoppable.
At IPTel, we are actively designing and building SDA Fabric networks. At first there has been a great deal to learn, but we are now actively working on more projects, so if you need some help with yours, drop us a line.
ASSOCIATED BLOGS:


.png)
.gif)